TDIing out loud, ok SDIing as well

Ramblings on the paradigm-shift that is TDI.

Wednesday, January 13, 2016

Externalizing an Attribute Map to a file

Hit the More... button at the top of the AttMap - to the right of the Add and Delete buttons - and select Change inheritance. In the resulting dialog click External attribute map and select a file.

The external mapping feature of TDI uses text files that contain one or more mapping rules. Each mapping rule looks like this: name=assignment. Here is an example of a mapping rule:

uid=

This example rule specifies output attribute named 'uid'. The assignment follows the equal sign (=) and is empty in this example. As you can see from Table 1 below, this indicates that the value will come from a similarly named attribute found in the Work Entry. To explicitly specify the source attribute you must write a snippet of Javascript:

uid=work.employeeCode

Now the value written for 'uid' will come from the work Entry attribute named 'employeeCode'.

If more complex script is needed to compute the value for a mapping assignment, you can use square-brackets notation shown in the first table below. This allows you to include multiple lines of Javascript for a single mapping rule.

Table 1: External mapping file syntax
Mapping
Description
sn=
When the assignment is empty then simple mapping is used.

In the example rule shown in the left column, the attribute named 'sn' gets its value(s) from a similarly named attribute in the source Entry. For an Input Map this would be the 'sn' attribute of the conn Entry. For all other map types (Output Maps or Attribute Map components) the source will be the work Entry.
status='Updated'
Anything entered after the equal sign is considered the assignment of the mapping rule. It must be a snippet of Javascript, unless the Text with Substitution flag is used: {S}

In the example rule shown in the left column, the 'status' attribute will get the value specified by the Javascript snippet, resulting in the literal string value Updated
giveName=[
first = work.FirstName
last = work.LastName
return first + " " + last
]
Using square brackets as shown allows the Javascript assignment to stretch over multiple lines.

In the example mapping rule, a full name value is returned by concatenating the FirstName and LastName attributes in the Work Entry.

Flags can also be specified to control the behavior of a mapping rule. These flags must appear in curly braces immediately after the name of the attribute being mapped. Valid flags are: A, M and S. 

The A and M flags correspond to the Add and Mod columns in the Output map of a Connector in Update mode, and control whether this attribute is mapped during Add and Modify operations. 

The S flag denotes that the assignment uses the TDI Text with Substitution feature, which allows for literal text values that can include one or more substitution tokens.

 For example:

uid{A}=work.employeeCode

Now the 'uid' attribute will only included when creating new entries (Add operations).

Table 2: Example mapping rule flags
Mapping
Description
objectClass{A}=
The 'A' and 'M' flags are used to control when this attribute is enabled with regards to the Add and Modify operations of a Connector in Update mode. By default, attributes will be included for both Add and Modify operations unless only one is specified: A or M.

The A flag shown in this example specifies that the 'objectClass' attribute should only be mapped for Add operations.
mail{S}={work.uid}@acme.com
The 'S' flag indicates that the following mapping rule uses Text with Substitution. As a result, any curly braces found will be replaced with the value of the substitution token specified in the braces.

For this example, the value of the uid attribute in the Work Entry is substituted for the token {work.uid} and then the literal string '@acme.com ' is appended to it. The resulting string is returned as the value for 'mail'.

Friday, April 10, 2015

What is the System Store?

The System Store is a database that TDI uses to 'remember' stuff like:

  • the last change read, when you use one of the Change Detection Connectors (also called CDCs);
  • the snapshots of data used to compute changes when using the Delta Engine together with an Iterator Connector;
  • data read using the System Store Connector, which writes and reads full Entry objects with any number of Attributes;
  • objects (of any kind) saved using the system.setPersistenObject() call. These can further be retrieved with system.getPersistenObject(), and removed with system.deletePersistentObject();
  • Sandbox data when you run an AL in Record or Replay modes;
Plus a few other things.

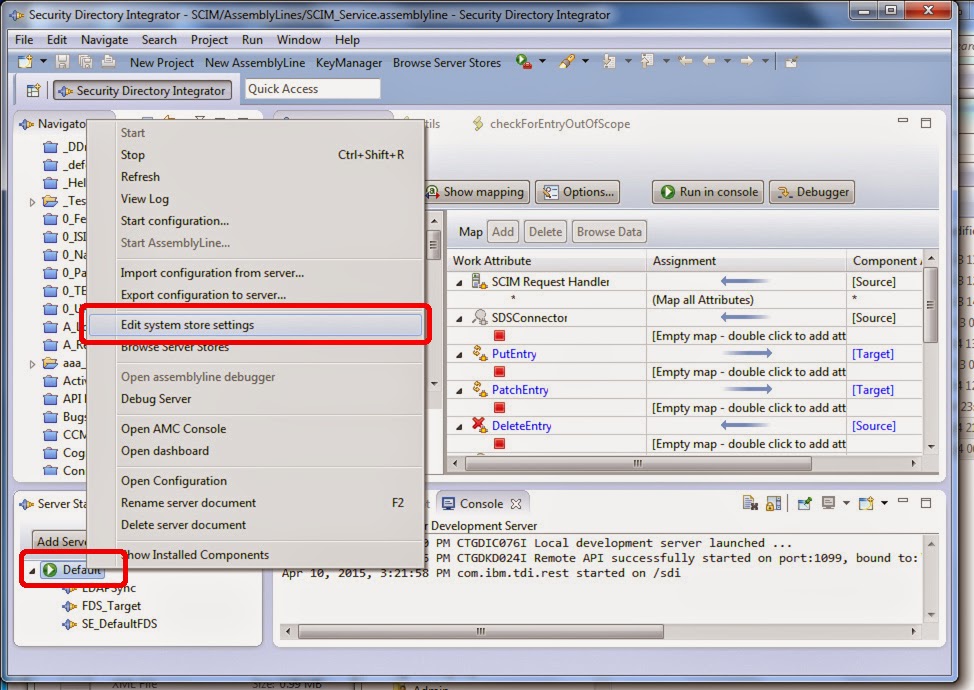
By default, TDI gives you the Derby database system, which is a fully functional open source RDBMS. You can change the System Store used by the TDI server at any time by simply right-clicking on that server in the Servers View and selecting the 'Edit system store settings' option.


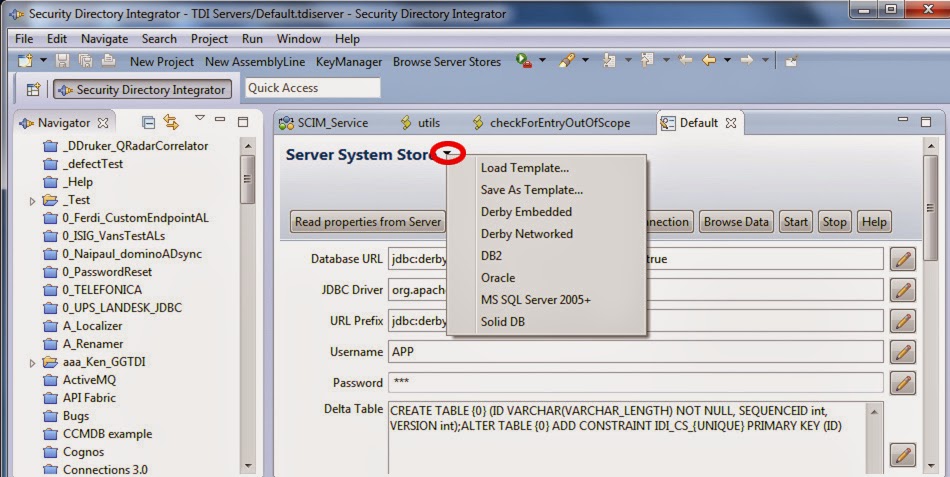
This opens up the Server System Store page with its settings. At the top of the page, next to the title, is a drop-down arrow that lets you choose from a list of supported RDBMS's to use as the System Store.


When you select one of these options the various settings below are populated with default values for that system, including all the CREATE statements for standard TDI tables. Only the topmost settings on this page need to be edited to include the actual hostname for your database server,  as well as database name, port used and authentication credentials. Once this has been changed then the new System Store can be tested using the Test Connection button. When TDI is restarted then the server will use the new System Store settings.

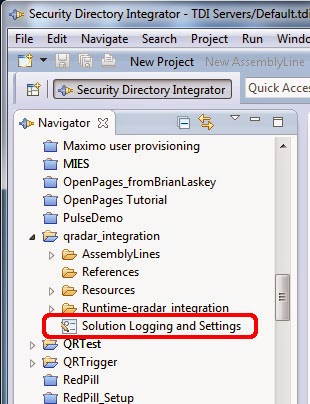
Note also that you can define the System Store settings for a Project as well. The Project-specific setting is found in the 'Solution Logging and Settings' item under that Project.


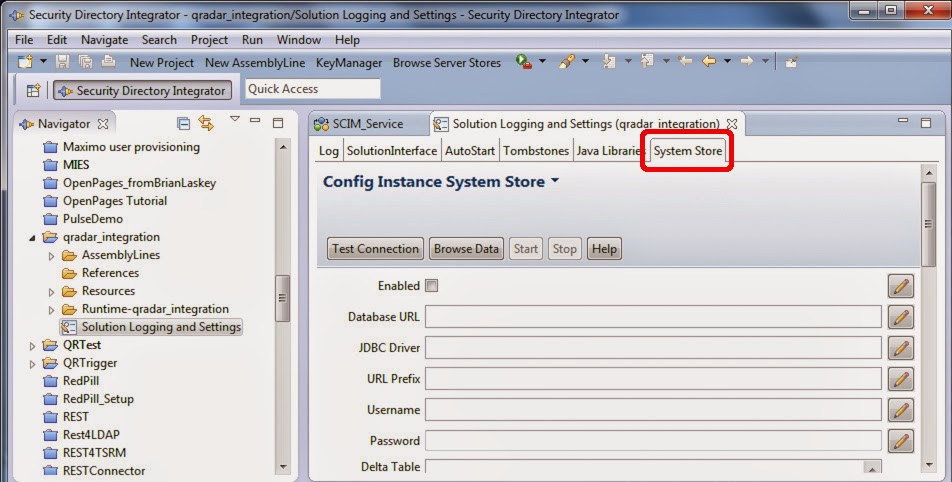
The right-most tab labeled 'System Store' will give you access to the Config Instance System Store settings.

Now whenever an AL in this Config uses the System Store then it will be working with the database system assigned to the Project.

If you use the Browse Server Stores feature to view the contents of the System Store, then the 'last change' information saved by Change Detection Connectors will be easily read in the ID_PS_Default table. This is also where persistent objects that you save in your script is kept.

Each item here will have the key it was saved with - for example, the Iterator State Key value of a CDC, or the key used for a system.setPersistentObject() call - as well as a legible value. However, if you try to access this table using a JDBC or Database Connector then you will see that the value column (called 'Entry' in the table) is a BLOB. This column actually contains serialized Entry objects. If you still want to access this information directly using JDBC then you will have to deserialize the Entry value like this:

     // For example, in the After GetNext Hook you can grab 'Entry' from conn
     // and deserialize it to a new Attribute called 'Value'.
     entryObj = conn.getObject("Entry"); // get the actual Java object value
     conn.Value = com.ibm.di.store.StoreFactory.deserializeObject(entryObj);
     // Now 'Value' can be mapped into Work and is human readable

Finally, it's important to note that System Store settings are stored in the solution.properties file, where you will also find the setting to have the TDI Server automatically launch the Derby RDBMs when it starts up. This property is commented out by default as shown here.

        #com.ibm.di.store.start.mode=automatic

Simply remove the hash mark (#) to make startup automatic. This option is not used when other database systems are selected for the System Store.

Monday, March 2, 2015

Importing a client certificate from an https service

I have cobbled together a simple AL that can be run from the commandline in order to import a client certificate from an HTTPS service. For example:

ibmdisrv -c configs/tdiingOL.xml -r importcert -0 https://supportcenter.checkpoint.com

The above call results in this output (including the standard TDI is startup messages):

CTGDKD024I Remote API successfully started on port:1099, bound to:'SessionFactory'. SSL and Client Authentication are enabled.
com.ibm.tdi.rest started on /sdi
com.ibm.tdi.rest: com.ibm.tdi.rest.cache.enabled=false
CTGDIS1957I Added certificate with subject: CN=supportcenter.checkpoint.com, OU=MIS-US, O=Check Point Software Technologies Inc., L=San Carlos, ST=California, C=US.

As you can see from the commandline above, the config xml file (tdiingOL.xml) should be copied to the configs folder of your Solution Directory.

This config can be downloaded from here.

Note that you will need TDI 7.1.1 Fixpack 4, or SDI 7.2 Fixpack 2 in order for this to work.

Wednesday, February 11, 2015

JSON and XML Tutorial - Part 2

Well, this one is focused on JSON and I rolled it into a quick video.

https://www.youtube.com/watch?v=VHmf76FMI-U

Enjoy, and please comment if anything is unclear (or unsaid).

Thursday, February 5, 2015

Easily implementing a monitoring API to your TDI solution

All you have to do is make AssemblyLines with the names of the operations you want to expose.

For example, I have a solution that catches incoming events over TCP  and dispatches the payload data to one or more 'event triggered' AssemblyLines. Like all server mode based ALs, this one uses multiple threads to deal with client traffic (the AL Pool), and shared log output can get a little convoluted. This makes monitoring and troubleshooting tougher.

So I leveraged a web server functionality first found in SDI 7.2.0.2 and TDI 7.1.1.4 that lets me run an AL named 'status' in a Config named 'MyRestAPI" by dialing up this URL in a browser.


The MyRestAPI.xml file needs to be in the <tdi soldir>/configs folder.

My 'status' AL has a single script that grabs some objects shared between the AL threads.

      // Get the shared objects - both are Javascript objects
      metricsObj = java.lang.System.getProperties().get("metricsObj");
      errorsObj = java.lang.System.getProperties().get("errorsObj");

      // Make the return payload
      returnPayload = {
            status: (metrics == null) ? "Not running" : "Ok",
            metrics: metricsObj,
            errors: errorsObj
      }

      // Set up HTTP attributes for the reply to the client
      work["http.body"] = toJson(returnPayload);
      work["http.content-type"] = "application/json";
      work["http.responseCode"] = "200";

Whenever an event is serviced by the TCP Listener AL, the metricsObj object is updated by calling metrics.gather(endmsecs - startmsecs), with the msec variables having been set before and after dispatching an event to its handler AL. A scripted logmsg() function keeps track of "ERROR", "FATAL" and "WARN" level log messages in the shared 'errorsObj' object.

The result message looks like this:

{
"status" : "Ok",
"metrics": [
{ 
"eventName": "Auth Voilation",
"duration": {
"max": 1,
"min": 1, 
"avg": 1, 
"total": 1
},
"responses": 1 
},
{
"eventName": "Health Metric",
"duration": { 
"max": 16,
"min": 0,
"avg": 0.3785425101214575, 
"total": 187
},
"responses": 494 
},
"errors": [], 
}

I have also added an 'admin' AL that looks for the query string parameter 'pause', and if the value is 'true' it sets a flag in metrics that causes the capture() function hang until its value is 'false' again. Your imagination is the limit here. That of course and time.

Note that the port used by SDI web services, as well as other comms settings, are found in the solution.properties file.

## Web container
web.server.port=1098
web.server.ssl.on=true
web.server.ssl.client.auth.on=false

Below these are the properties for the SDI dashboard (https://localhost:1098/dashboard).

Monday, January 26, 2015

Passing arguments to your AL when launching it from the command-line

In the ibmdisrv command-line used to launch your AssemblyLine, you can use one of the user-defineable options -0 through -9 to pass information into the AL.

For example, in order to pass the name of an input file to the AssemblyLine named 'ReadFile' you could use this command-line:

  ibmdisrv -c MyConfig.xml -r ReadFile -0 c:/Input/HRExport.csv

Then in the Prolog - Before Initialize Hook of the File Iterator used to read this file you can retrieve the filename from the command-line argument and apply it to the 'filePath' parameter of the Connector like this:

  fileName = main.commandlineParam("0");
  thisConnector.connector.setParam("filePath", fileName);

Of course, you will also want to harden this code a little to deal with missing command-line option values, etc.

Monday, November 24, 2014

Hardening an AssemblyLine

This is done with a little effort in three areas:
  1. Error handling
  2. Log handling
  3. Auto-reconnect
For Error Handling you need to add code to the Prolog - On Error Hook for connection errors in components, and to the DataFlow - Default On Error (the catch-all Error Hook for all Connector modes). Here you will want to capture all error information to the log in order to help troubleshooting the issue. This can be done very simply by dumping he 'error' Entry to the log:

    task.dumpEntry(error);

The 'error' Entry holds a number of Attributes that indicate the error message and exception class, as well as where and when the error occurred. The 'exception' Attribute of the 'error' Entry is the Java exception itself, and you can print out the stacktrace using script like this:

   var sw;
   var pw;
   var ex = error.getObject('exception');

   if (ex != null) {
      try {
         sw = java.io.StringWriter();
         pw = java.io.PrintWriter(sw);
         ex.printStackTrace(pw);
         pw.close();
      } catch (ex2) {
         var sw = ex
      }


   task.logmsg("ERROR", sw.toString());

Note also that if you enable Error Hooks then execution will continue in the AssemblyLine as if nothing had occurred. So you will want to deal with the error yourself, for example by issuing a call like system.exitFlow() to stop the current cycle, or system.skipEntry() to pass control to the Feed Iterator in order to read the next entry. Or you may wish to re-throw the exception in some situations:

   throw error.getObject('exception');

Log Handling means making conscious decisions about how your ALs perform logging. Of course all log messages are added to the TDI Server's logfile (ibmdi.log). However, this can make it difficult to find and isolate messages, particularly if your solution has several AssemblyLines. Instead each AL should likely have its own log. My favorite LogAppender is the FileRollerAppender, which maintains a set of historical log files, rolling these by appending a number to the file extension each time the AL is run.

You may also want to provide a couple of log files for each AssemblyLine - one Appender set to log at INFO or DEBUG LEVEL, while another that only captures error messages - e.g. by setting the LogAppender level to WARN, which will include WARN, ERROR and FATAL.

I typically have my own scripted log() function that includes information about where in my solution the logging is taking place.

   function log(lvl, msg) {
      var toConsole = false;
      if (typeof lvl === 'undefined') { // if no arguments
         lvl = 'INFO';
      }
      if (typeof msg === 'undefined') { // if only one argument
         msg = lvl;
         lvl = 'INFO';
      }

      // In case the log level is not in uppercase
      lvl = lvl.trim().toUpperCase();

      // CONSOLE level = print to console
      if (lvl.startsWith('CON')) { // 'CONSOLE' log message
         toConsole = true;
         lvl = 'INFO';
      }
      // All error messages also go to the console
      if ('WARN'.equals(lvl) || 'ERROR'.equals(lvl) ||
          'FATAL'.equals(lvl)) {
         toConsole = true;
      }

      // Now to determine where log was called from.
      // First get the AL name
      var where = '[' + task.getShortName();

      // Afterwards comes the current component (if not an AL Hook)
      try {
         var compName = thisComponent.getName();
         where += '/' + compName;
      } catch (ex) {
         // was not in an AL component
      }

      // Now add the Hook name (if inside a Hook)
      try {
         var hookName = thisScriptObject.HookName.getValue();
         where += '/' + hookName;
      } catch (ex) {
         // was not in a Hook
      }

      // Log the message
      task.logmsg(lvl, where + '] ' + msg);

      // Print some messages to console as well
      if (toConsole) {
         java.lang.System.out.println(lvl + " - " + msg);
      }

   }

I have this function defined in a Resources > Scripts Script that is tagged to be implicitly included for all ALs.

Finally, Auto-Reconnect is a feature of Connectors and Function components found in the Connection Errors tab. Here you enable the reconnect feature typically only for when a connection is lost. The Number of Retries parameter is set to an adequate value, with the Delay Between Retries in seconds. In this way, if the connection goes down then the component can attempt to reconnect and then continue.

Note that the Reconnect rules must be set for this component. If you don't see built-in rules here then you will need to define your own, as described here.